As a group you need to "edit" your exercises and post to the blog.
Please post Group Exercise #1 and #2 before class time on Tuesday!
Please type name/# of exercise in title and type of all group member names in body of post. Share any important notes such as type of camera, camera log information, etc.
+ + +
Here are the steps you will need to follow:
1. Set up your project file in FCP
Probably 1080 24P (but this depends on the camera and your setting filmed with
(Instructions on handout)
2. Log & transfer (HD footage) using card reader or with mini-usb connecting camera to workstation
or
Log & capture (for HDV tape) using Canon H40
3. Edit your clips in sequence. Add desired effects and required titles.
4. When your video is finished, you must render and mixdown
a. Sequence > Render All > Both to render video and audio
b. Sequence > Render Only > Mixdown to render all audio
5. To export FULL RESOLUTION Quicktime File:
File > Export > Using Quicktime
Make sure "Make a self contained movie is checked!"
This export will export HIGH RESOLUTION if you are exporting "same as sequence settings".
By cntrl clicking (or right mouse clicking) you can GET INFO (Cmd I) and determine file size. This file is NOT optimized for upload with Vimeo.
6. To export a COMPRESSED (or smaller file) Quicktime File:

 2
2


TO UPLOAD VIMEO CLIP TO CLASS BLOG:
1. Click SHARE on Vimeo clip
2. Copy the EMBED code
3. Log in to blogger.com account
4. Select TCF 312 CLASS blog in your dashboard list
5. Click NEW POST
6. Click on HTML tab (top right)
7. Paste the Vimeo EMBED code
8. Click on COMPOSE tab (top right next to HTML tab)
9. Type name/# of exercise in title and type of all group member names in body of post. Share any important notes such as type of camera, camera log information, etc.
+ + + +
IF YOU ARE NEW TO FCP7 OR CONFUSED FROM CLASS, YOUTUBE HAS TUTORIAL SUCH AS THESE:
For JVC footage (SD cards), please LOG & TRANSFER into FCP7, such as demonstrated here:
Please post Group Exercise #1 and #2 before class time on Tuesday!
Please type name/# of exercise in title and type of all group member names in body of post. Share any important notes such as type of camera, camera log information, etc.
+ + +
Here are the steps you will need to follow:
1. Set up your project file in FCP
Probably 1080 24P (but this depends on the camera and your setting filmed with
(Instructions on handout)
2. Log & transfer (HD footage) using card reader or with mini-usb connecting camera to workstation
or
Log & capture (for HDV tape) using Canon H40
3. Edit your clips in sequence. Add desired effects and required titles.
4. When your video is finished, you must render and mixdown
a. Sequence > Render All > Both to render video and audio
b. Sequence > Render Only > Mixdown to render all audio
5. To export FULL RESOLUTION Quicktime File:
File > Export > Using Quicktime
Make sure "Make a self contained movie is checked!"
This export will export HIGH RESOLUTION if you are exporting "same as sequence settings".
By cntrl clicking (or right mouse clicking) you can GET INFO (Cmd I) and determine file size. This file is NOT optimized for upload with Vimeo.
6. To export a COMPRESSED (or smaller file) Quicktime File:
Follow the settings noted here (shown as screenshots below)
--> The right side of the window gives you video clips on Exporting with FCP7 & uploading to Vimeo.


1. File > Export Using Quicktime Conversion
a. CLick on OPTIONS
b. Click on VIDEO SETTINGS:
 2
2
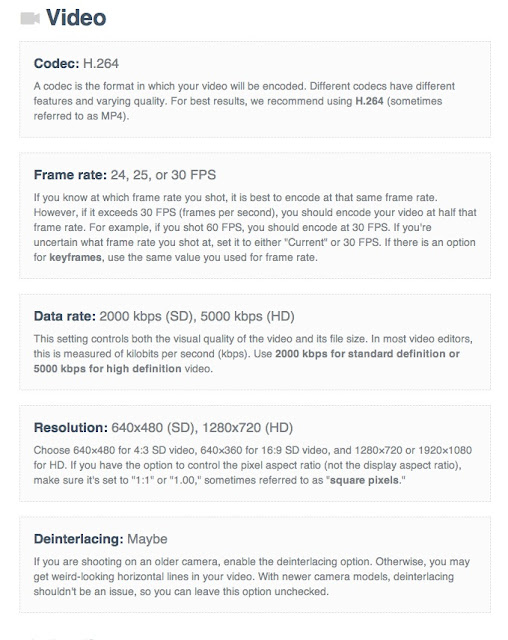
2. Change your video settings as follows:
a. Make sure H.264 is selected
b. Make sure current FPS (or desired fps) is selected
c. Change Data Rate: from Automatic to RESTRICT to 5000 for HD (or 2000 for SD)
d. click OK to save your settings

3. Under Video Settings Click on SIZE and select what Vimeo recommends (the shorter the project the larger settings you may use --- typically 1280 by 720, but you can experiment here).
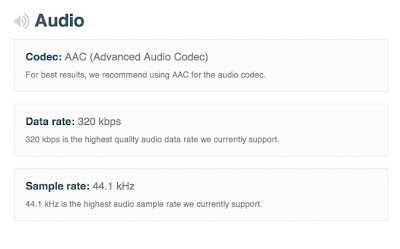
4. Click on SOUND SETTINGS:
a. Change Format form Linear PCM to AAC
b. Change Rate from 48 to 44.100
c. Change Quality from Normal to Best
d. Change Target Bit Rate to 320
e. Click OK to save your settings


5. SAVE YOUR FILE ---- NOTE on FILE NAME
When you save your file DO NOT use any spaces, dashes, funky characters, or a long name. If you must indicate a space, please use _ such as Group1_Titanic or Group2_Professional. File names that don't follow this will often have errors in Vimeo upload (and will make you crazy!)
TO UPLOAD VIMEO CLIP TO CLASS BLOG:
1. Click SHARE on Vimeo clip
2. Copy the EMBED code
3. Log in to blogger.com account
4. Select TCF 312 CLASS blog in your dashboard list
5. Click NEW POST
6. Click on HTML tab (top right)
7. Paste the Vimeo EMBED code
8. Click on COMPOSE tab (top right next to HTML tab)
9. Type name/# of exercise in title and type of all group member names in body of post. Share any important notes such as type of camera, camera log information, etc.
+ + + +
IF YOU ARE NEW TO FCP7 OR CONFUSED FROM CLASS, YOUTUBE HAS TUTORIAL SUCH AS THESE:
For JVC footage (SD cards), please LOG & TRANSFER into FCP7, such as demonstrated here:
Here's a tutorial for HDV footage (tape media) LOG & CAPTURE, such as demonstrated here:
No comments:
Post a Comment