Thursday, August 2, 2012
DSLR Group from UA, Telecommunication and Film on Vimeo
Sarah, Ashley, and Jeremy DSLR Class Footage
Wednesday, August 1, 2012
Assignment: Blog Post #10 :: FINAL COURSE REFLECTION
This post is due by 10 am on Friday, August 3.
What did you learn about camera, lighting, video production, theory, methods, practice, and most importantly, yourself as a filmmaker or as a creative artist from taking this course?
Reflection should be 350 – 500 words.
POST ON YOUR BLOG!
What did you learn about camera, lighting, video production, theory, methods, practice, and most importantly, yourself as a filmmaker or as a creative artist from taking this course?
Reflection should be 350 – 500 words.
POST ON YOUR BLOG!
Tuesday, July 31, 2012
Looking Forward: Assignment: REEL & ARTIST STATEMENT
For our final assignment you must edit a 1-2 minute reel of your work as a videographer - this means all the footage you have shot (in any classes or projects) is allowable. If you are low on content you may create a Director/DP reel but you must specify what you filmed and what you directed.
For your reel: Keep in mind lots of folks have many different reels for different kinds of jobs they pitch for but for this assignment, choose your favorite shots (for their look/aesthetics) and put them together in a way that represents your style and technical skills.
You are encouraged to browse old 312 sites and see what your peers have put together. Here are a few:
: 0px;">
Additionally post a short ARTIST STATEMENT (350-500 words) with your embedded video clip, see below for some examples of reels and artist statements.
Some sample DP reel links:
Sample Director Reel Links:
ABOUT ARTIST STATEMENTS:
When faced with a blank page, the best thing to do is write down words that you would use to describe your work. Do the same for the process(es) you use to make your work- list out the processes you use. The next step is to start to link the words into sentences. After you write the sentences, see if you can put them together into paragraphs. If you have several bodies of work you might do this process for each body of work.
- from the Artist Foundation on how to write an artist statement
THINK ABOUT:
your vision
your visual style
your influences
the impact you desire to make with your work
When you want to apply for grant money for filmmakers, you will often be asked to submit an artists statement.
IFP Center for Media arts asks you toProvide a written discussion of no more than one page describing your creative journey as an artist and your creative filmmaking process and vision.IFP Center for Media arts asks you to See here.
Here is documentary filmmaker Chuck Olson's artist statement
Amazing filmmaker Yvonne Welbon's artist statement
Filmmaker Dominic Angerame's artist statement
Painter, poet and filmmaker Rajaa Gharbi's artist statement
Filmmaker Tara Krause artist statement
Filmmaker Ronit Bezalel artist statement
Filmmaker Valerie Soe calls her artist statement her manifesto
Keith W. Cunningham shows his influences in his artist statement
Feminist Filmmaker Alex Juhasz artist statement
Scott Snibbe's is here

Sunday, July 29, 2012
XDCAM WORKFLOW
If you chose to film on the SONY EX3, you have to transfer (transcode) your footage to edit with FCP7.
The software is on the computers in 130 and also available for download HERE.
Here is a pdf file explaining the WORKFLOW and how to use the transfer software. Choose the Log & Transfer Plug-in for Apple Final Cut Pro 7.
Ask if you have questions.
The software is on the computers in 130 and also available for download HERE.
Here is a pdf file explaining the WORKFLOW and how to use the transfer software. Choose the Log & Transfer Plug-in for Apple Final Cut Pro 7.
Ask if you have questions.
Thursday, July 26, 2012
Assignment: Individual Blog Post #8 :: CAMERA SPECS
This post is due before class on Tuesday, July 31.
Please talk through your decision making process (with your DP) on selecting a camera or cameras to film your scene. What are you going to shoot on and provide an explanation of why, detailing specifically, which cameras you considered. Please describe the advantages of some cameras and the disadvantages of others that you considered?
Explain your thought process and give concrete examples from your scene and/or the scene you DP. 350 -500 word post.
POST ON YOUR BLOG!
Wednesday, July 25, 2012
Scene Assignment Example 2: In-class Exercise (Thursday)
THE ASSIGNMENT
Working as one large production team, you will film TWO VERSIONS of the same script.
For both versions the location is a booth (the Crimson Cover set), surrounded in black
w/beautiful background hanging lights, inspired by these:


PRODUCTION SCHEDULE:
Location: Studio A
9:30 Production Crew Meeting - prep w/Dr. R
9:45 Set Dressing & EQ load-in
9:45 Director maps out blocking and camera positions
10:00 Lighting Version 1 (hi-key w/Kinos)
10:00 Director rehearses with actors (while DP is lighting the set)
10:30 - 11:30 Film Version 1
11:30 Wrap Kinos & switch crew
11:30 Light for Version 2 (low-key w/Arri Lights)
11:50 - 12:20 Film Version 2 (pick a couple selected shots to film - you won't have time for all)
12:20 - 12:30 Wrap Equipment & Return
THE SCRIPT:
INT. RAFFAELLO'S BISTRO - NIGHT
In a romantic corner booth, KATIE, twenty something sweet girl who looks like you could bring home to Mom, waits for her ex-boyfriend TAYLOR, also twenty something clean cut and cute, to arrive.
KATIE (to herself)
I can't screw this up, I need him back!
Taylor arrives. He is friendly but distant, and Katie seems to have forgotten that she is trying to impress him.
KATIE
Hi!
Taylor sits down. Katie slides closer to him.
KATIE
(continues)
Where have you been?
TAYLOR
(dismissive)
Around.
KATIE
Around?
TAYLOR
Yeah.
Katie slides in closer.
KATIE
Well, now that you're here...
Fade to black.
“The Date” - VERSION 1 (hi-key, “romantic”
lighting)
Shot List:
1A. MS Katie – she sits alone in the booth, she looks up to
see Taylor arrive.
1B. WS Kate – she looks up, sees Taylor. He enters and sits
down.
1C. OTS MS Taylor - dialog
1D. OTS MS Katie - dialog
1E. MS Glidetrack to CU Katie – her final line
Storyboards:
Storyboards:


Lighting Style: hi-key, evenly lit on their faces though the background is all black except for beautiful ambience lighting (hanging globe lights). No shadows fall on actors faces.
Visual Inspiration:

This shot shows 2 things: bright, but even light on the subjects (not the shadows on the cheek like shown here) and a black backdrop - this is what I want, plus glowing string lights for abmience.

This shot better shows the hi-key lighting w/o shadows on her face. Soft light. Light in her eyes.

This photo again shows even light on her, and bg goes soft.

I don't like the background or the color palette for this shot, but I like that she's evenly lit.
PRODUCTION CREW
Director –
Tyler
D.P. –
Connor
Camera
Operator – Robert
A.C. –
Shelby
Gaffer –
Ashley
Gaffer –
Kamal
Gaffer –
Brad
Gaffer –
Justin
Gaffer /
Grip – Rey
Gaffer /
Production Designer – Sarah
Grip – Alec
Grip / Focus
Puller – Jeremy
Grip / Dolly
Grip– Shane
Grip – Stephanie
Sound
Recordist / Boom Operator – Kourtney
Note: Some crew will be in and out for meetings w/Dr. R. Adjust crew accordingly.
Note: Some crew will be in and out for meetings w/Dr. R. Adjust crew accordingly.
EQ LIST:
SONY EX3
Battery
Gitzo
Slyder dolly
w/stands
2 Kino kits
6 c-stands
10 sandbags
3 stingers
3 power
strips
white bag
w/clamps
globe bulb
string lights
Zoom H4N recorder
fishpole
headphone
Zoom H4N recorder
fishpole
headphone
+ + + + +
“The Date” - VERSION 2 (low-key, dark & “edgier” lighting)
Shot List:
1A. MS Katie – she sits alone in the booth, she looks up to
see Taylor arrive.
1B. WS Katie – she looks up, sees Taylor. He enters and sits
down.
1C. OTS MS Taylor - dialog
1D. OTS MS Katie - dialog
1E. MS Glidetrack to CU Katie – her final line
Visual Inspiration:

I want moody lighting, like a single light source. Bur rather than it coming from the wall, I want it to be like an over head light that throws a pool of light on the table.

This photo shows what I mean about moody lighting that is edgy. I want a circular pool of light to spill on the table and only a little on them, when they lean in.
The lighting here is a bit too warm, but shows the pool of light that I mean for the table. And background is too fancy, I want black like the photo above (for version 1) but I want it dark, edgy and contrasty --- low-key style.
PRODUCTION CREW
Director –
Tyler
D.P. –
Robert
Camera
Operator – Shelby
A.C. – Rey
Gaffer –
Kourtney
Gaffer –
Kamal
Gaffer –
Stephanie
Gaffer –
Alec
Gaffer /
Grip – Jeremy
Gaffer –
Sarah
Grip –
Ashley
Grip / Focus
Puller – Connor
Grip / Dolly
Grip– Shane
Grip – Brad
Sound
Recordist / Boom Operator – Justin
Note: Some crew will be in and out for meetings w/Dr. R. Adjust crew accordingly.
Note: Some crew will be in and out for meetings w/Dr. R. Adjust crew accordingly.
EQ LIST:
SONY EX3
Battery
Gitzo
Slyder dolly
w/stands
2 Arri kits
3 flags
3 red nets
3 green nets
black wrap
3 c-stands
10 sandbags
3 stingers
3 power
strips
white bag
w/clamps
globe bulb
string lights
Zoom H4N recorder
fishpole
headphone
Floor Plans are coming!
FYI: a pigeon is a junior wall plate (!)

FYI, a junior is a 2K (or 2,000 watt light) --- each light has named it is called --- see your lighting book!
Scene Assignment Examples Xavier Burgin's "And Goodbye"
From Xavier: As an filmmaker I can't stress enough how important it is to make a detailed binder that completely encompasses your entire film. One of the problems you get with people who are creative is the fact they come up with amazing ideas, but they can never make it a solid, tangible package.
They're too busy making one awesome idea rather than building an entire story. It's cool to have a gimmick or set up the story is based around, but without a good story you have nothing. When it comes to film, you really need to have everything planned out even to the most minute detail.
Many filmmakers rush a film without planning the logistics and fail. Here are two rules you can live by.
1. A scene will always take longer than what you predict
2. It's not if a mistake will happen. It's when.
This is why you want to be as organized as possible. So I want go over how I make a production package.
1. Actor's Info, Crew Info, Location Info, Prop Info, Contracts (Actor's Release, Location Release, etc...)
2. Script
3. Shot List
4. Storyboard
5. Floor Plan
6. Scheduling
7. Shooting Script
8. Visual References
9. Revised Pages
10. Equip List
11. Miscellaneous

This may seem overboard, but I'm going to explain each one and why you should do it.
First, get notebook dividers that have numbered division. You can also get colors, it doesn't matter. Just make sure to buy enough to throughly divide your work.
Before I begin on the first page.
I have one lone page that has my logline, a short description of the film (two paragraphs usually), and then a story summary (around four to five paragraphs).
You need to be able to explain your film in one sentence or in a few paragraphs. In the story summary write out your first act, second act, third act, and conclusion. Do not skip over a part of your story you are unsure of. If you have not figured it out in your summary, you probably haven't fleshed it out in your script.
1. The first divider will be for all of the actor's info, crew info, contracts, location info, and props. As you are looking for actor's and locations write down who the person is or who owns the location. Write down all the props you'll need to buy for the film.
This will help you to keep everything you are doing at the beginning of pre-planning in check. Be sure to get Actor Release Forms and Location Release Forms to avoid legal trouble. You can find pre-made ones anywhere online.
2. This is a no brainer. You must have a script before shooting a film. Don't wing it. Don't say I have it all in my head. You don't!
You are going to waste someone's time if you don't put it on paper. When you write the script follow proper screenplay format. Download screenwriting software, Celtx.
Have someone else read your story. You will always be bias to your work. You will always think it's good when it might be a polished turd.
3. Your shot list covers all of the shots you will need in your film. This ties in with your storyboard. You might end up doing them both at the same time or one before the other. It's based on you, but I recommend doing your shot list first.
Go through your script and visualize every scene (how you place your characters, where do cuts happen, movement, etc...) and write out what it would look like.
Ex.
Scene 1A - Medium Close Up of Emma sighing and reaching for pen
Scene 1B - Close Up of hand reaching for pen
Scene 1C - WS of Emma picking pen up then standing up and walking out of room
Scene 2A - WS of Emma walking out of room and into hall
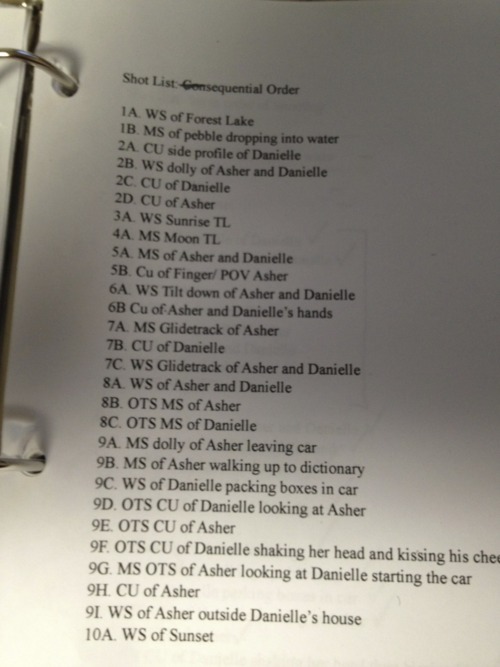
Shot List in Sequential Order
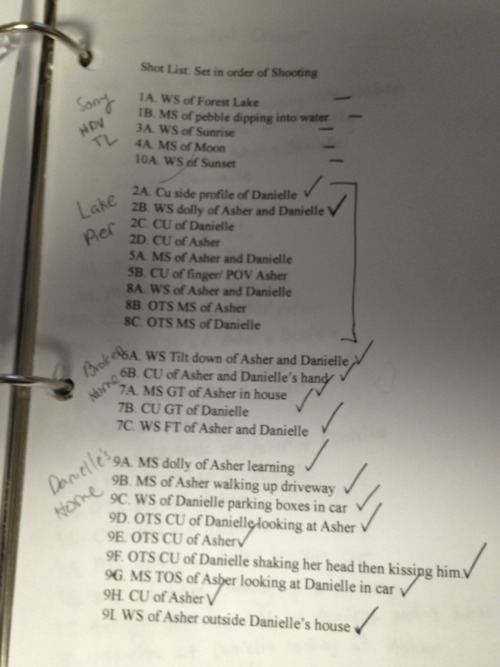
Shot List Based on Scenes we will shoot based on availability of actors and locations
(this is a Shooting Schedule, when you add times that each shot will be filmed!)
Those were a little more detailed than what you'll need, but it's your preference. Go through your entire script and figure out how many shots you'll need and list them by scene, then in order alphabetically.
4. Your storyboard is the visual representation of your film. It is (in my opinion) one of the most important parts of understanding your film's aesthetic. You may say, 'Well I can't draw."
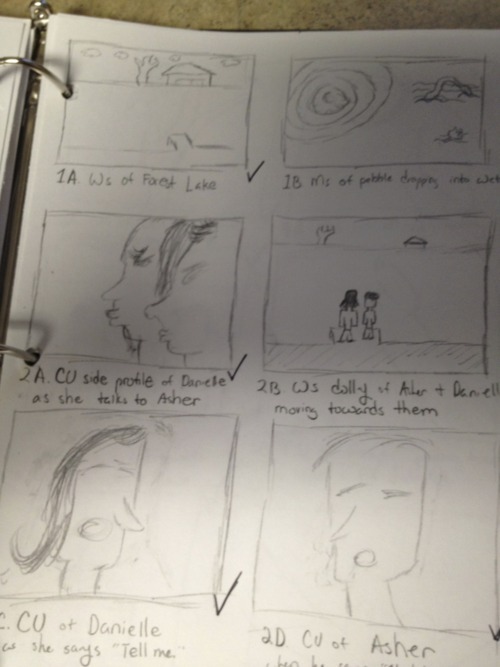
Tough luck, draw stick figures because you NEED to do this. If you're ashamed of your drawing skills sit down with someone who can help you visualize. This will be tedious and time consuming. Do it. You will thank me later.
5. So you've figured out your shots and have a decent storyboard. Cool, during this time you should be out scouting location.
Take a camera with you and photograph all angles of the location. If you don't have a camera handy (YOU SHOULD! Why don't you have your own camera! You love film don't you! Eat Ramen Noodles and save up those pennies!) take the photos with your phone.
Once you have the pictures it's time to make an outline of the location from a bird's eye view. Account for tables, chairs, extra rooms, etc...)
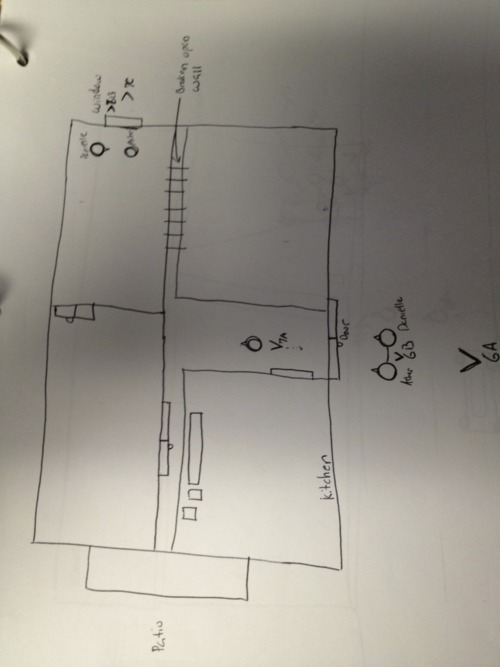
You'll notice that ovals with small triangles on them and V's on the paper. The ovals represent the actor's blocking and the small triangles represent his nose. This is so we know where the actor is facing and the direction of camera's shot.
6. I did not put anything into the binder for scheduling since I constantly updated scheduling through email and Google Docs. Once you have locations and actors you're going to need to figure out when they are available. You also need to know (based on your script) what time of the day you want certain scenes to be shot.
You will then need to coordinate with your actors and crew for Crew Call (when the crew must be at the location) and Actor's Call (when actors must be at location), what days and times you'll have certain actors, what days and times you'll have certain locations, and (based on the previous) when you can shoot certain scenes.
I've done this on my own several times. I don't like it, so I usually work with or hire a Producer (individual who handles the non-creative logistics such as telling actors where and when to be, figuring out your film budget, etc...) who will look over all of this and figure it out for me.
A Producer is invaluable. Even in college, if you want to have a smooth film, you should go ahead and link up with individuals who take themselves seriously, and enjoy brining a film together on the business side.
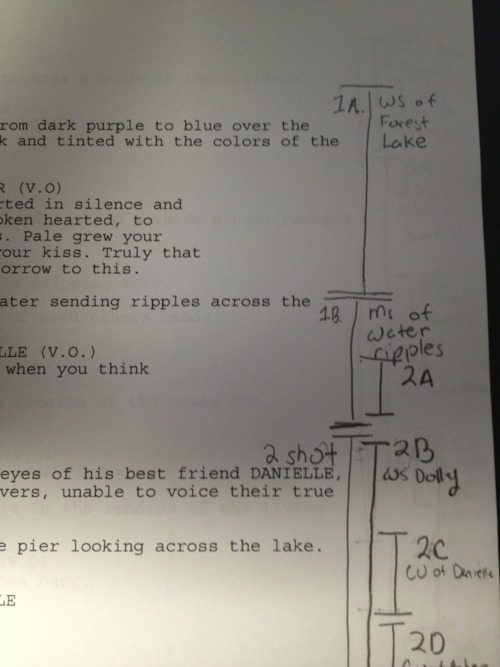
7. This one is pretty simple. Remember when I told you to visualize how each scene in your script will happen shot by shot? Now, put your shot list on the side of your script by where it corresponds with the script. Do this to your entire script.
8. Visual References are just pictures, notes, poems, or anything that embodies the aesthetic your film is trying to achieve. For this pre-production package, I wanted a sense of destruction counteracted by the beauty of nature (specifically a lake). Here are two of my visual references.

9. NEVER throw away anything. Even when you are done with it you never know when something may fall out or you forget an updated script or shot list. At least if you have your old work you can go back and try to remember what you revised. Never throw away anything you've written.
10. This one is straightforward. Just write out the equipment you feel you will need to finish this project.
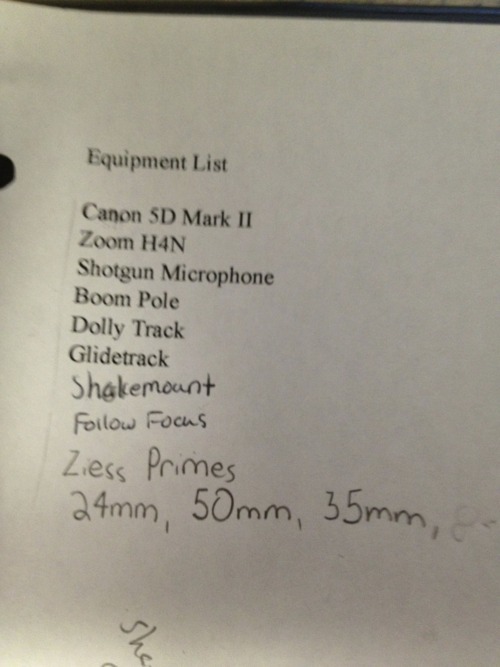
(Dr. Raimist Note: it is spelled ZEISS!)
11. Finally, anything else that doesn't fit into these categories will go into Miscellaneous.
That's a full production package. Next time you shoot a film take out the time to make something extensive and detailed. If you think this is overkill, I assure you you're going to have a hard time making your vision come to life.
Film Made With Production Package Shared Above:
Feel free to contact me for any questions at quethelights@gmail.com or in the comments section!
Subscribe to:
Posts (Atom)